I have been shooting the night sky since my grandfather gave me my first 35mm SLR in junior high. Today’s digital SLRs allow us to shoot amazing things that I could only dream of a couple decades ago! Below are some tips and suggestions that I teach at night photography workshops for shooting the Milky Way.

NIKON D700 + 14-24mm f/2.8 @ 14mm, ISO 2500, 30/1, f/2.8
1) Planning
Before you go out shooting, it’s best to do some planning to know the best times and locations to even see the Milky Way. For starters, there are some basic terms that should be defined to help you know which time of night is dark enough.
1.1) Twilight
Generally speaking, night is between sunset and sunrise, but of course it does not get suddenly darker like a light switch! There are some transition periods between day and night that are good to know. This transitional period is known as twilight, and can be dawn (morning) or dusk (evening). Most photographers are familiar with the phrases “golden hour” and “blue hour”. They are rather broad terms without any real scientific measurement, but they are the coveted times of day with beautiful light before, during, and after sunset or sunrise. We’ll try to define them a bit more accurately in a minute. But first, let’s look at the scientific terms.
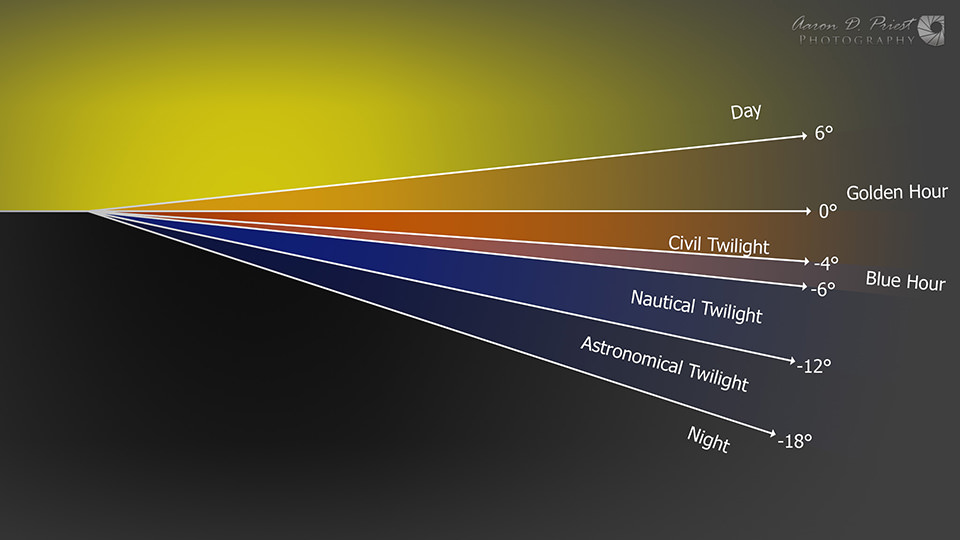
Twilight is defined in three distinct phases, and is based on the elevation of the sun: civil, nautical, and astronomical. Sunset and sunrise are when the sun is at 0° elevation on the horizon. To see the sun at this measured time you would have be at sea level and observe the sun rising or setting over the ocean with no obstructions. If you are higher on a mountain, you will see sunrise earlier. If you are in a valley, you will see it later of course. For example: Cadillac Mountain in Acadia National Park throughout most of the year is the first place in the United States to see sunrise because of the elevation and how far east it is. Other times of the year it is Mars Hill in Aroostook County.
Civil twilight is when the sun is between 0° and -6° below the horizon. Nautical twilight is -6° to -12°, and astronomical twilight is -12° to -18°. Twilight at dusk or evening begins with civil twilight at sunset, dims through nautical twilight, and ends after astronomic twilight when the sun is -18° below the horizon. At this time the night sky is as dark as it will be for the rest of the night until dawn when the process will reverse with astronomic twilight beginning when the sun reaches -18° below the horizon, climbs through nautical twilight, and ends after civil twilight at sunrise. Blue hour and golden hour overlap some of these twilight phases and definitions of them vary, but you could consider golden hour to be when the sun is 6° above the horizon to -4° below the horizon, and blue hour from -4° to -6°.
The Milky Way is best photographed during the darkest period of night between the end of astronomical dusk and the beginning of astronomical dawn. On either side of that is nautical twilight and blue hour, where only the brightest stars and a few planets are prominent but the Milky Way will get washed out. Blue hour and nautical twilight are my favorite times to either start a timelapse for star trails, or end one, with some rich dark blue colors in the sky.

NIKON D700 + 14-24mm f/2.8 @ 15mm, ISO 800, 19/1, f/2.8
1.2) Location
Astronomic dusk and dawn will vary between seasons and locations. To translate these twilight terms into specific times for our geological location we have to use apps and almanacs. One of my favorite apps for this on an iPhone is PhotoPills. It is a powerful all-in-one program that I’ve found no equal for on Windows, Mac, Linux, or Android. But there are several other programs you can jump between to get some of the same information. The Photographer’s Ephemeris is a good program on an Android. Stellarium is free for Windows, Mac, and Linux and a great tool for looking at constellations, planets, sun, moon, and Milky Way positions for a specific location and date.
1.3) Seasons
The Milky Way changes orientation and elevation throughout the year as the earth pivots on its axis during our seasons. You can see the Milky Way all year long, but it’s the galactic core or center of our galaxy that is the brightest and most photogenic, and that is what we are trying to capture. Where I live in Maine, the galactic core rises from the horizon around 132° on the compass dial in the early morning hours before astronomic dawn in the spring, and the Milky Way forms a nice low panorama in the sky. By summer it is visible for much of the shorter nights but is oriented up and down and passes directly overhead around midnight or a little later, about 165° to 212° on the compass dial. In the fall the galactic center is visible right after astronomic dusk and sets below the horizon very quickly, still standing straight up and down and passing directly overhead, from 206° to 228°. In the winter, the dimmer portion of the Milky Way (one of the spirals we live in), passes directly overhead and settles into a very wide arch around 180° of the horizon. Quite often light pollution on the horizon prevents you from getting a very good panorama of it though. It’s pretty much the opposite for those that live in the Southern Hemisphere. It’s easiest to see this by changing dates and times in Stellarium. PhotoPills also makes it easy with their tutorial.

NIKON D700 + 14-24mm f/2.8 @ 14mm, ISO 2500, 241/1, f/2.8
See the virtual tour
1.4) Light pollution
Light pollution is big factor in choosing a good location. You want to get far away from city lights for dark skies and a clear view of the Milky Way. Dark Sky Finder is a good map for looking at light pollution in the United States. You are looking for areas in the black or blue ranges if possible. There is also an iPhone app available. Dark Site Finder is another resource with some world maps.

NIKON D700 + 14-24mm f/2.8 @ 14mm, ISO 2500, 30/1, f/2.8
1.5) Moon phase
The moon phase will greatly affect your ability to shoot the Milky Way. It is best to shoot during a new moon, as the brightness of a quarter moon or more will wash out the Milky Way, and it is impossible to capture the Milky Way during the weeks the moon is sitting in the middle of the galactic core. This is easily predicted with software like PhotoPills and Stellarium though. Often the week before and after a new moon can still be useful for Milky Way photos as the moon rises or sets during the night and still leaves a few hours of shooting. Also, moon rises and moon sets are beautiful for timelapses, and a quarter moon or less behind you makes for some great foreground lighting. A quarter moon or more will give very strong foreground lighting and interesting shadows for timelapses. With the correct white balance it can look like a daytime photo, but still have several stars in the sky. The sky will be quite blue like nautical twilight, and timelapses or star trails can be very beautiful with fewer stars and brighter foregrounds.

NIKON D700 + 14-24mm f/2.8 @ 14mm, ISO 2500, 32/1, f/2.8
1.6) Weather
Weather is another critical component of planning your shot obviously. Usually I’ve already planned a location and time for a Milky Way composition days or months in advance, but the weather will be the final determining factor. Weather Underground is good for looking up current weather and sky conditions, moon phase, and start/end of each twilight phase for your location, particularly in the astronomy section. What I analyze the most is the cloud cover on the hourly graph for the night. I’m looking for 0-10% cloud cover for clear Milky Way shots. If there’s 20-50% at dawn or dusk with a slight breeze, I know I might have some epic timelapse material instead! Clear Sky Chart is another good resource that astronomers use. You can see the cloud cover, transparency, seeing, and darkness for various observatories throughout North America. There’s an iPhone app for that as well.
1.7) Tide
If you are shooting around the ocean, the tide is a critical subject you must be aware of—potentially life-threatening and certainly hazardous to unattended camera equipment. It’s easy to lose track of time and get stranded at a place you easily walked out to at low tide, or leave a camera running for twenty minutes or more and find the tripod legs under a foot or more of water unexpectedly. Like weather or anything else, it is wise to plan ahead and be aware of circumstances, such as the times of high and low tide, and the amount of rise. Storms further out in the ocean can make it surge higher or faster than expected too, even if the weather is clear where you are. Most GPS units will give you tide estimates for your location. One of my favorite iPhone apps is TideTrac, it only requires cell phone service once for an area so load it up when checking the weather before heading out in the field where you might not have service. Weather Underground has a great marine forecast section that includes current heights of waves based on marine buoys.

NIKON D700 + 14-24mm f/2.8 @ 14mm, ISO 1600, 241/1, f/2.8